Image hover effect in blogger, is a trick used by many of pro bloggers. When you move your cursor to any of the image the hover effect over it takes place and its view is more clear then before.It's a small css trick that is done by adding styling to your blog css and define its class while using your image url in blog posts.![]()
How to make image hover over effect.
And place the below css above </head>.
a.linkopacity img {
filter:alpha(opacity=50);
-moz-opacity: 0.5;
opacity: 0.5;
-khtml-opacity: 0.5;}
a.linkopacity:hover img {
filter:alpha(opacity=100);
-moz-opacity: 1.0;
opacity: 1.0;
-khtml-opacity: 1.0; }
</style>
Now whenever you embed your image in blog or blog posts you use codes like below.
Whenever you use blue codes like below in your blogs for images.
Use below green code in place of above blue code to have hover effect.
Difference in both codes is that i have added class=linkopacity in red in second code.
Example:
Before adding the code

After adding class=linkopacity


REFERENCES:-
Blogspot Blog
Read more...
Creating running text/marquee gives your blog style. You can exihibit this at the beginning of your blog as an introduction or you can put it anywhere else as you please. To go about this![]() ,
,


width="100%" onmouseout="this.start()" scrollamount="2"
align="center">YOUR INITIAL TEXT (CAN BE ANYTHING)
<b>  »  </b>
<a href="http://YOURBLOGADDRESS.blogspot.com/">
AGAIN HERE YOUR TEXT.
</a> - <a href="http://YOURBLOGADDRESS.blogspot.com/">YOUR TEXT
</a> - <a href="http://YOURBLOGADDRESS.blogspot.com/">YOUR TEXT
</a> - <a href="http://YOURBLOGADDRESS.blogspot.com/">YOUR TEXT
</a> - <a href="http://YOURBLOGADDRESS.blogspot.com/">YOUR TEXT</a> </marquee>
Incase for some reason this is not working or something has gone wrong, below i am illustrating the same example with the widget for this website.
and http://YOURBLOGADDRESS.blogspot.com/

REFERENCES:-
Blogspot Tutorial
Read more...
On some websites you may find that when you hover the mouse pointer on the links (hyperlinks), they change their colors. Same as on this website. In case you would like to know how to go about this![]() ,
,
A free rainbow script from Dynamic Drive will help you achieve this.
Steps to carry out:
For example only (do not use it)
http://kangrohman.googlepages.com/rainbow.js
Create a code like this:
<script src='http://kangrohman.googlepages.com/rainbow.js'/>
For confirmation that it is working properly in your blog, hover the mouse on the hyperlinks if the link has wink and the color changes automatically, it means it works well.

REFERENCES:-
Blogspot Tutorial
Read more...
Translation button is a useful feature if the website is not ![]() to be found in the language of your choice. With this button you can translate the website content to a language which you can read.
to be found in the language of your choice. With this button you can translate the website content to a language which you can read.
To do this follow the steps below:
Click on  Click on
  Choose
Add the below code into the JAVA/SCRIPT Page Element
The same button can be obtained from here

Read more...
Auto scrolling posts like "news headlines" shows the posts in the form of news headlines the same way as one see's on different TV Channels. As you can see on this website this widget gives one a brief idea ![]() of what posts the website contains in an auto scrolling manner.
of what posts the website contains in an auto scrolling manner.
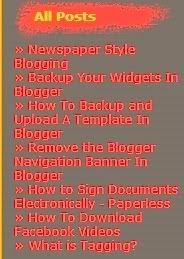 To do this follow the steps below:
Click on  Click on
  Choose
  Add the below code into the JAVA/SCRIPT Page Element
Now just a little explanation on what has to be done in the above code:
Download the above javascript file which has been mentioned in the above code.
How do you do this?
Just copy and paste the below web link
http://iwebgator.com/tools/RecentPostsScrollerv2.js
in your web browser address bar and the javascript will open in your web browser.
Goto Edit in your web browser and click Select All.
Copy and Paste the data on a notepad and save it under the name RecentPostsScrollerv2.js
Now you have your own javascript file which you have to upload to uploading web site.
For this you can open a free account at
1)SigMirror
2)Ripway
3)Hotlinkfiles
There may be more such sites.
Once the uploading is done go to your HTML CODE and replace the javascript http://iwebgator.com/tools/RecentPostsScrollerv2.js file web link, with the web link which you have uploaded to your free uploading account.
(For example if you have opened in SigMirror than your java script link for the javascript file which you have uploaded will be something like this http://www.sigmirror.com/files/2222_freetidbit/AllPosts.js. This is just an example.)
Now once this is done replace in the HTML CODE this blog address by your own blog address,
example:
The blog address for this website:
http://freetidbit.blogspot.com/feeds/posts/default?alt=json-in-script&callback=RecentPostsScrollerv2
Replace it with your blog address like this
http://YOURBLOGADDRESS.blogspot.com/feeds/posts/default?alt=json-in-script&callback=RecentPostsScrollerv2
Similarly anywhere else that you find this blog web address http://freetidbit.blogspot.com
replace it with your blog address http://YOURBLOGADDRESS.blogspot.com
![]()

Read more...
As you can see the first letter in this post is "A" which is reproduced in the newspaper style of printing. Incase you are wondering
![]() how this is done here are the steps to go about it,
how this is done here are the steps to go about it,

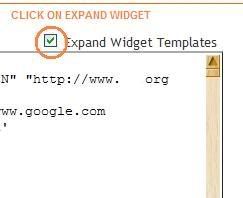 Search
 ![]() in the EDIT HTML template for the code
in the EDIT HTML template for the code
Now save your Template.
Now got to Settings > Fromatting > Post template
And add the below codes there and save it.
Now whenever you will start a new post you will get the above codes in EDIT HTML tab where you can place your First Letter in place of "FIRST ALPHABET".
Or you can add the above codes manually before starting every post and place your First Letter.![]()

Read more...
Backing up of widgets is very important if one wants to change their template, because otherwise when a new template is uploaded all the widget data will be lost. A couple of ways to backup the widget data are as described below.
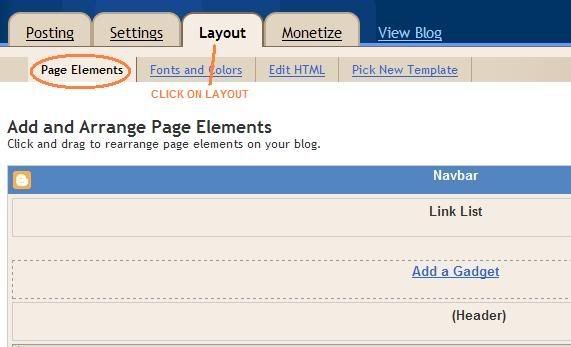
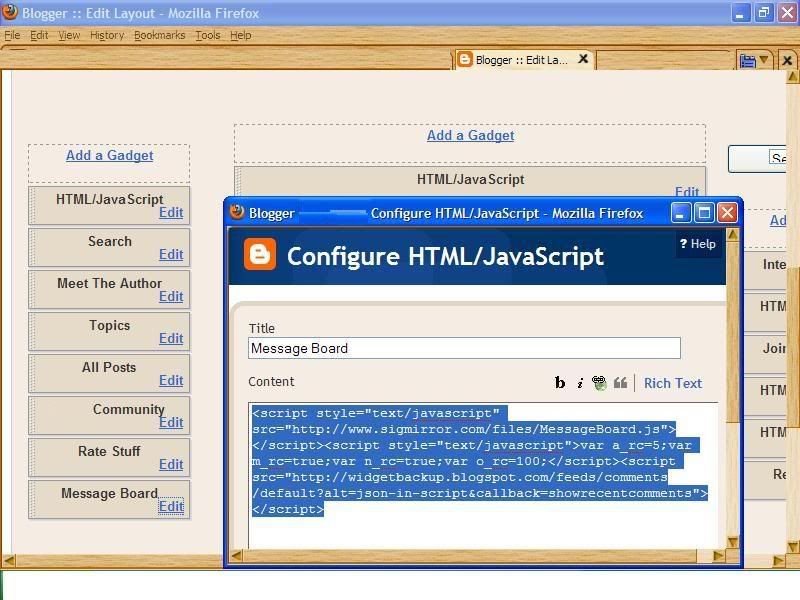
One way is directly from the Page Element.
Backup Widgets from Page Element.
To do this the following steps are to be performed,
Repeat these steps for each of the Widget Page Element. That's the way to save your widgets, but this is a very cumbersome and time consuming way. Hence there is another way by which you can backup your widgets.
Back up widget through Template Source Code
This is a much quicker way to go about saving your widgets.
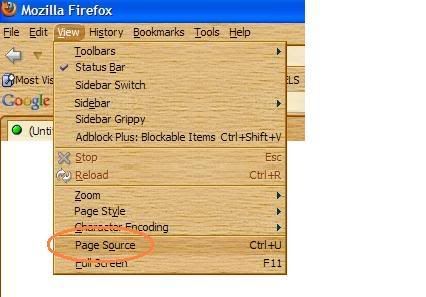
If you are using Firefox the same can be done by going to VIEW menu and PAGE SOURCE submenu and saving the same.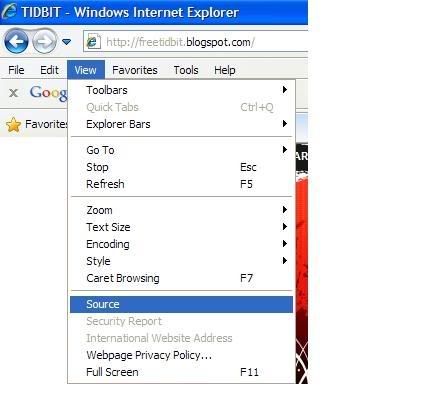 With this you will open your Widget HTML Source page which you can save it in Formatted HTML view.
 This is the other way to save your widget and save a lot of time which you would spend if you didn't backup your widgets. If you need to search the widget data in the Widget HTML Source page, than it always begins with the
And terminates with the code
If your Template Source Code displays the following code

Read more...
Template backing up and uploading is a basic procedure. But for a first time blogger even this can be a bit complicated.![]() And in case you would like to know how to upload a new template than follow the procedure mentioned below :
And in case you would like to know how to upload a new template than follow the procedure mentioned below :
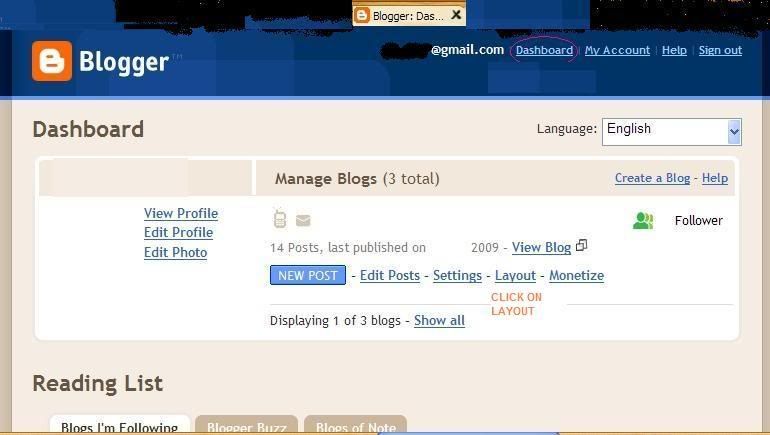
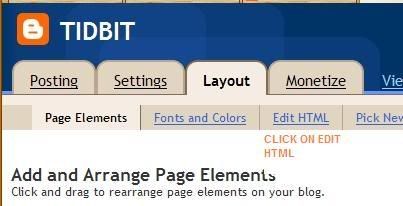
Now in case you want to Upload the same template or a new template.
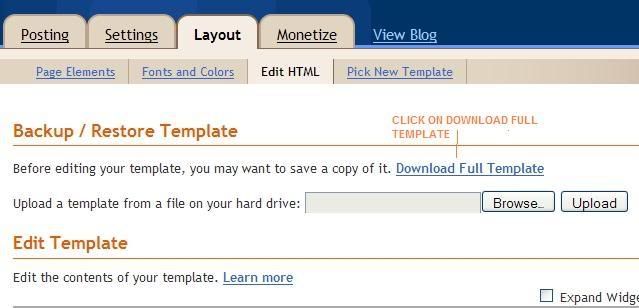
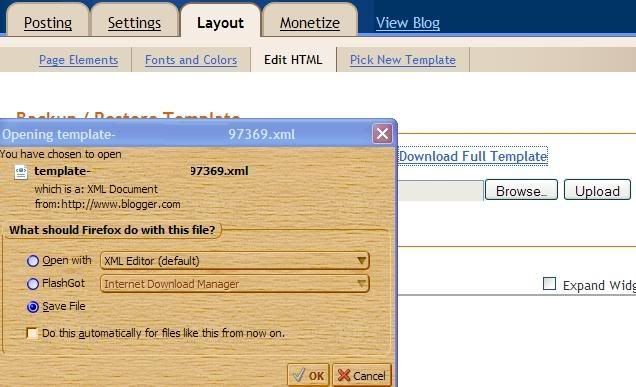
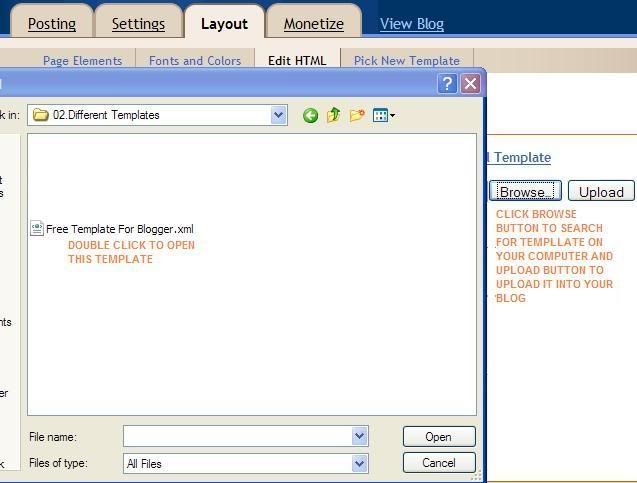
![]()

Read more...
Sometimes one may want to hide the blogger banner, though personally i have felt the need for this Navigation bar. But in case you would love to hide this the following would be of help
To hide the Blogger Navbar :
1- Log in to blogger
2- On your Dashboard, select Layout. This will take you to the Template tab. Click Edit HTML. Under the Edit Template section you will see you blog's HTML.
3- Paste the CSS definition in the top of the template code:


Remove the code to show it again.

REFERENCES:-
Blogger Templates
Read more...
There’s a PDF / Word document waiting in your email inbox that you need to print on paper, put your handwritten signatures, scan the signed copy and send it back to the client again via email.
That process is both time consuming and forces you to do something that you are trying so hard to avoid (i.e., use paper). So if you are looking to eliminate paper from the loop, here are some software tools, web services and workarounds that will help you capture your signature directly on the electronic file without requiring paper or ink.
Steps To Electronically Sign Documents
The first step is to create a digital image of your signature - there are multiple ways of doing that:
Option #1.
If you have a scanner, an iPhone, iPod Touch or any touch sensitive mobile device, use an app like “Fountain Pen” or “Sketch Pad” to draw your signature using your fingers and then transfer the image to your computer.
Option #2.
If you have don’t have access to a touch phone or a scanner, put your signatures on a white piece of paper and take a photograph of that paper using your digital camera or even the camera of your mobile phone.
Option #3.
Alternatively, you can use any graphics software (like MS Paint), an online image editor (like Splash Up) or even Google Docs (see video) to draw your signature with the mouse pointer. I like the Google Docs options since it creates a transparent stamp of your signature.
Option #4.
Go to Live Signature, draw your signature on the screen and click the “Create Signature” button to download your signature as an image.
Now that you have the written signature in image form, the next step involves putting that e-sign image into the document.
If the contract or agreement is in Microsoft Word or any other common editable format, things are pretty easy. Open the document in any Word processing software (or Google Docs) and insert the signature image inline. Save the document as PDF and email it back to the client.
How to Sign a PDF Document
If the initial document is in Adobe PDF format, you need to follow a couple of extra steps because, unless you have a PDF editor like Adobe Acrobat, editing PDF files is not always straight-forward.
Option #1:
Convert the PDF document to Word using this free web service, add the image to the Word file (as in the previous example) and export the document as PDF to prevent editing. The PDF to Word service may not always replicate the exact formatting and appearance of the original PDF file but it’s still very close especially in the case of text documents.
To password protect your signed-PDF documents, open the document inside PDF Hammer, add a password restriction and re-export it as PDF.
Option #2:
If the PDF document that you have to sign is long or includes complex formatting, conversion may not be the right option for you. In that case, you have two choices:
2 a: PDF X-Change - This is awesome PDF Viewer for Windows that also includes some very useful editing features.
 Import the signature image into the Stamps Palette, open the PDF file that you want to sign and use the stamps tool (under Tools -> Comment & Markup) to sign anywhere in the document. You can then export the signed document as PDF and none of the original formatting should be lost.
2 b: OpenOffice Draw - The latest version of OpenOffice 3.1 along with this free Sun Extension can be used as a a PDF editor.
Once installed, click the OpenOffice icon on your desktop and open the PDF document - this will auto open in OpenOffice.org Draw. Now choose Insert -> Picture -> From File to insert the signature image anywhere in the PDF file.

The good part about OpenOffice is that it is available for Windows, Mac and Linux platform but there’s no individual install for the Draw module so you’ll have to download the full 150 installer of OpenOffice.org but choose to install only Draw at setup.
Web Apps for Electronic Signature
The options discussed above are handy if you have to sign documents but what if you are on the other side of the fence and need another party to sign your document electronically.
In that case, you should consider using web based signatures services from either EchoSign or Right Signature - they both work on similar lines. You upload a PDF or Word document that needs to signed and also specify the email addresses of people who have to sign that file. The recipients can open the document inside their web browser, add their signature (with the timestamp) and done.
You can then download the signed document on to your own computer. There’s no software to install and no sending fax messages back and forth. Both Echo Sign and Right Signature are paid services but trial users can send up to 5 documents for free.

REFERENCES:-
Digital Inspiration
Read more...


